Wednesday, December 2, 2009

May Be Back

Dear lovelies,

I got discouraged during the dead computer and new computer and all that went with starting over. I had a couple huge changes in the last few months. Don't worry I still have my family, still love my husband, no problems there. Drama is so small when put up against the important things. I have also been behind on learning SBC3 so I have been feeling guilty about sharing what I don't know with others. Thank you for the encouragement though.

Samantha: I have no advice on the technical issue. I suppose calling the company is the best solution. I hope you didn't wait too long. I should have responded sooner, but too stubborn to admit defeat right away.

Any kind words will be greatly appreciated right now to get my energy redirected again.

love, geezee

Saturday, October 3, 2009

New Computer!

I now have a new computer. I managed to get my new 3.0 version of Storybook Creator. WOW. Let me know what you want me to explore first. Pray that I can recover my Memory Manager software. I do have the shadow copy, but my original disc is no longer to be found.

geezee

Thursday, September 10, 2009

Computer died...tut in limbo. Trip going well. Cell phone blogging has its limits. Wishing all well. Hero hubby working on getting laptop going for me.

Anxious to use new upgraded version of SBC+. So glad I have shadow copy of Mem Man. I did post a tut for shadow copy right?

More later,
geezee

Sunday, September 6, 2009

Friday, August 28, 2009

I am working on it.

I really am working on the tutorial I have lined up. Posting headaches and packing up for a 3 month trip I leave for on Monday morning have me running in circles. Maybe I will finish when I am sitting in the airport. I am sure DS6 will accomodate since we will be traveling together and have to report to airport @ 4am. ; )


geezee

Wednesday, August 26, 2009

New Brag Pages

Wow, Love Kim's new kit Deon

So I played.


I have the tutorial to go with these coming up next.

One last little housekeeping point. If you want me to stop offering brag pages here, let me know. I do try not to water this blog down with off topic stuff too much. Feels more business-like that way.
geezee

Friday, August 21, 2009

Calling all crabcakes

Crabcakes said...
Where o where could I PUHLEEZE get the brag book pages made with the Toof Fairy kit? (I bought the kit). I was out of town to a funeral and missed the expiration date. May I buy them? PUHLEEEEEZE?
Thanks! Regards, Crabcakes


I can be a generous soul. If you leave me your email in the comments section(I don't publish comments with personal info) I will email the links to you. I am flattered you like them.

geezee

Saturday, August 15, 2009

Revisit # 1

Christy said,
Have you gotten your hands on the new SBC upgrade? Trust me, you need it!!!
I don't have it yet, but can't wait. You can type text on a path! And round
corners!

I didn't have any idea that something is coming out. Oh, please let it be so. I can't find anything about it. But I am so glad to have someone who knows. Woohoo! something to look forward to. Please let me know the minute it comes out. I will be one of the first to get it I promise.


Now, on to today's business. I am revisiting former posts. I am not making many big changes to the original post, but in case newer people here are like me( grin) I don't often go back and explore older posts of other bloggers even if it would be in my best interest. I know not a good cyber-friend. Such is life. If any specific topics should be brought back up or revamped, I am ready. Still working with my new Memory Manager software and I don't feel proficient enough yet to teach anyone.

Revist #1
Convoluted way of predicting outcome of MASKS

Good morning folks. My synapses may be firing in line this morning and my calendar is clear for an hour or two. This means I get to play with you for a bit. You may feel like the mouse that got played with by the cat when I finish with you. Enjoy the ride!

*First the giftie
http://www.4shared.com/file/93669976/f2bfd289/giftie1.htmlThis is a background that can be used to figure out where the mask will cut your picture. Now we have to use the mask to cut the background paper, so we drag the mask onto the page and fill it with the background paper by using the paper icon on your tools tab.


I got this lovely mask from Kupivet here.


Now loading the paper as our background gives us the chance to line up the mask with the lines on our paper that may need to be adjusted a bit here and there.


Lock the mask. (I learned this from one of our group here.)


Now the picture will need to be lined up under the mask. This means turning the paper view off so that it is invisible. Then lining the picture up under the mask and making it fit the space that will be cut later.


cute pic huh?


Once the picture is where you want it you will need to save page as to create the paper you will use to fill the mask. Load the paper you created from the picture, drag the mask onto your workspace fill with the paper. Saving the picture the way we did places it in the position needed to fill the exact space the mask will cut from.


Told you it was convoluted. Hope it works. Please, Please, if someone knows a better way, I am all ears. Have fun! Now on to my vacation...
g
*I created a 4x6 page for this particular project thinking that the smaller workspace will make it easier to use the picture size. A larger workspace could be needed with other masks.

Lost Again

I seem to have been wandering around in my own fog again. I have so much STUFF going on. It's a wonder I actually get anything done with all I get myself in to. Travelled recently to visit a sister. That was good, but driving is not my favorite thing. It just seems to get me from where I am to where I want to be. Anyone have another solution?

I want to revisit some old posts and possibly get back my groove. Any new questions would be appreciated. I think my brain needs a kickstart.

Oh, in two weeks I will be travelling again and this visit will last 3 months. Lots to do before hand.

Friday, July 31, 2009

Credit Snafu

I told you I was typing with one eye open. I am not sure what the other one was doing, but not accessing my brain, I am sure. The lovely ladies who so Greatly deserve credit for designing the Fabulous items I used in the brag pages need recognition. First Kim and Gaye are the talented designers of the tooffairy kit. I am beginning to feel like they are my friends so I am embarrassed to say I Forgot ya girls. Now I am backpedaling like crazy.
I have so enjoyed working with this kit and I hope you enjoy it too. Run go get it quick. :)
geezee

Thursday, July 30, 2009

Brag Page Final Day

I am so excited at the response I have received this week with these brag book pages. Thank you for your enthusiasm. I am typing with one eye open. It's 5:30am and I am in a motel in the middle of nowhere. I am on my way to visit my youngest sister. But I love y'all so I wanted to get these up.


I think this first one is officially my favorite. I don't know why. And the next one is the last one that I have to offer for right now. If anyone has had any luck using these, I would like to know. On a side note: I am not a designer and I don't offer downloads on a regular basis. A little flaky in that regard. You know- the creative type. (did I say what I was meaning to say?) Oh, now I remember... these links will expire and I will take them down on August 5. Just some random date in the near future. If someone has a reason that date doesn't work for them please let me know.


g

Wednesday, July 29, 2009

Brag Pages Day 3

Today's brag pages are the last ones that are so similar. Made from toof fairy kit by Kim b and GSCreations I will post the last 2 tomorrow.
Have fun.


g

Monday, July 27, 2009

Brag pages Day 2

These came from the lovely Tooffairy Collab kit from Kim b and GSCreations.


This is another set of pages that are almost identical. I like both for different reasons, so I thought I would share both. I find myself critical of anything I do so I figure that there will be enough people who can use one or both and some will like one better than the other. So here goes. Something for everyone. Or not.


Loving all the comments. I can't believe Digifree found me again. That is some super-sleuthing software since I don't regularly post freebies. Maybe others who use SBC+ will be more apt to find our little bunch here on the web since appearing on Digifree. Oh well, this is fun anyway.


g

Updated Links

In post below I updated the links. If you didn't get both pages they are now both there. Sorry for the inconvenience. Next time, I will do this at O'dark thirty so that I think better. I can't seem to get it all straight when I haven't had my coffee.

Thank you Sharon from Tx for letting me know that I needed to get this fixed.

Two more tomorrow. I know GSCreations gave you a preview so I guess you can just wait and see what I have to offer tomorrow. Coffee first though, I promise.
g

Using Brag Book page in SBC+

I have covered using a QP in SBC+ in this post. Remember to use any premade page as a layer above the background so that you can place your picture behind it.

Creating a new project using the 4X6 size under local printer (I use landscape a lot) and your ready to make a page with your own beautiful pics and any brag pages you find else where.

{I am finding that Brag Pages seem to be the size I feel more comfortable with creatively. I may be stretching myself to use white space on larger layouts. I guess I just feel like I have to fill up all that emptiness with something? That may speak to all my other emotional issues. Too Much Info, I guess.}

Thanks Christy for reminding me. I knew I needed coffee.
g

Updated links Surprise Give Away

I am a few hours behind this morning so here is brag page 1 and its little sister. I just couldn't decide whether I liked it better with or without the elves so you get both. Have fun.
Kim and Gaye made this lovely kit called tooffairy. You can find it here.


.


Now I am off to have some coffee. Got any for me, Kim?

g

Sunday, July 26, 2009

Giveaway Surprise.

Upcoming Non-SBC+ surprise coming up Tomorrow. I played with a kit created by 2 of my friends this weekend. I will give out a couple goodies from my efforts.

g

Learning update

I thought I might post a pic from Photoshop Elements class. Since I haven't yet taken time to try to duplicate the processes in SBC+ there is not a tutorial to go with it. This gives me something to work on this week. This picture is my favorite of the ones I did. I used the sample pics that came with my computer (Vista version).
Original picture
Burned edges lesson. I love this one.

Thursday, July 16, 2009

Off Topic a smidge

I have been using and loving my SBC+ and MM programs for a few years now. Since they first came out, in fact.

First, a little bit of history on my journey into digital scrapbooking. I purchased a VERY expensive version of Photoshop Years ago. This program intimidated and frightened me. This led to frustration due to the fact that I wanted to be a good steward of my money. Since then, I have encountered a Photoshop instructer that has managed to get past this block I have about learning the software. If you understand this feeling, please comment below. I wanted to share with you my experience in case any of you would like to experiment with other programs.

Here is where you will find Jessica Sprague. I am taking one of her free classes currently, this is the second class of hers that I have taken. If any of my mumblings make sense to you, then maybe you think the way I do. She has a way of getting through to me. I wish you luck if you choose to go this route.

Loving learning new things,
g

Wednesday, July 8, 2009

Creative Memories Masks

Well, well, I found a post with masks. There is an explanation with them as to how to use them. Now CM is beginning to make more things we can use like we want. WooHoo. Check it out here.

g

Tuesday, July 7, 2009

Privacy

Any personal info left in comments will not be published. I respect the privacy of others.

: )

g

Monday, July 6, 2009

Quiet

Hello all,

Everything here has been quiet. No responses to any recent posts, so I hope they have been helping. We have been having a hot summer. Hope everyone is having a good summer, or winter depending on which part of the world you are in.

g

Wednesday, July 1, 2009

Hello folks, someone asked a question.
I have been working on StoryBook Creator for the past 6 months and was on page 98 when my computer crashed!!! Yikes! It has been so sad as I did not have the pages backed up but still have the jpegs available. Any idea on how to recover the .page files that may/may not be on the hard drive. We were able to recover some stuff with a data recovery software that we used but can't seem to find any software recovery that supports searching for the .page extensions...Any ideas?
Thanks.

I am not sure of other ways to recover lost files as I too have experienced this. I did find a way of getting them if you have the hard drive available to access. As always if someone would like me to contact them personally, leaving contact info in the comments will not be published. I will email or talk to you personally if possible.

If you have any way of exploring the hard drive files, you can move entire files of your storybooks or import them into your now working hard drive. Below is where I found the files for the three storybooks that I have on my actual computer.


This is another way to find them from an external drive. This is where most of mine are. Click on open a project.


This dialog box will open and give you a chance to explore any drives you have access to from this software.

Once you find the files on the fried drive you can copy and paste or drag and drop the entire file into to one on your desktop. The storybooks will be found in Creative Memories folders.

This was my quick answer, and if I get more feedback I will share. I really can talk you through a lot on the phone if needed. Remember I don't share your info. I am unsure of the extent your drive is damaged. I hope this could help.

g

Friday, June 26, 2009

Search Bar added

Welcome friends,

I noticed that I have rambled about several topics concerning Storybook Creator Plus and Memory Manager. I added a search this blog function to the right. --->

Tagging the posts may take me a bit, as I am a bit fussy about what I think people will be looking for. The titles of the posts are chosen to be a good guide, so going to the archives and selecting the arrows should make old topics more readily accessible. I know I get a bit fluffy-headed at times, but I try to make things easy to find. I will entertain suggestions as to a way to make this easier. I could revisit old subjects if need be. What do you think?

g

Wednesday, June 24, 2009

Hints

More response woohoo! I never really thought about going this route. I think I like this method also. I know it works because that is how I have deleted stuff when reformatting. Who Knew?
Thanks again.

Jewell offered:

One quick hint - you can add kits another way, too - but you have to do it before you launch the program. If you have your scrapbooking stuff saving to your 'My Documents' folder (which is the default on setup - it would only be elsewhere if you put it elsewhere) you can browse My Documents->Creative Memories->My Scrapbooking Stuff and it will list all the folders in your 'My Stuff' section. You can then ad a folder directly here. You do have to make sure you have the subfolders 'papers' and 'scraps' or it won't be able to read the folder. But it is a fast way to add a few kits, launch SBC+, do your scrapping, then go in and remove the kits.

Saturday, June 20, 2009

Shadow Copy

I found a video on Creative Memories website. Can be accessed from your welcome screen in the software. This includes instructions for backing up to discs also. I prefer the shadow copy option. Also, I put my shadow copy on an external hard drive for safety's sake.

This link directly brings up the video posted on CM website. CM Video for setting up Shadow Copy . More helpful links are found here

Screen shot from video showing where to find Shadow Copy setup in 2.0 My reason for using this method for saving my data is that I habitually reformat my computer. It is a thing I do kind of like spring cleaning. Type A personality I think. Nice way of saying that I am a bit obsessive compulsive, I guess. In all my adventures with recovering my pictures, I have found that a shadow copy is my quickest most reliable option. I also have two count them (2) external hard drives. OCD again. Whenever I am hooked up to one of them. I can open my Memory Manager and close it again and changes that have been made will automatically update. How easy is that? Then when I need to backup my stuff before a reformat, it is that quick. Yay, I like quick and easy.


Dialog box presenting options to choose placement of shadow copy. I recommend an external hard drive. It does not always need to be connected, but will only update upon closing the program while connected. Do this frequently when you have been making changes such as importing pictures or updating info and organizing.
Version 3.0 see that shadow copy shows a red x next to it? That means that I either do not have one set up or that the external hard drive that I have it set up on is not hooked up. Nifty, huh? Another reason I like the upgrade. I know when I open Mem Man looking at this screen that I will have an update when I close it or not. Kind of a mental reminder that I need to plug into by external drive.
After clicking on the words Shadow Copy this dialog box appears and lets you choose where to put your shadow.

Fun, Fun, Fun.
g


MemMan 2.0 Vault Recovery

Ok Friends, I had to get a bit creative with my response to this question

Christy said...
I can't find the feature to recover the entire vault. I can have it search for the photos to bring them into the program, but they are not sorted!
I went to the videos CM has on their site in order to make screen shots so they will be a general idea rather than an exact replica. Sorry, my hubby's computer lost 2.0 somewhere in the atmosphere. Lucky me, I have what I do on mine. Now my resources are somewhat limited but I will do what I can.
In MemMan 2.o I found that the welcome screen is where they put what is needed. I would click on Memory Vault at the top of the screen to find my options for recovering.


Now this last screen shot is as far as I could get with what I found. Choosing Recover from CD/DVD this may give you a dialog box letting you browse to the location of your backups.

I really hope this helps. I am now using their video to show you how a shadow copy works. I definitely recommend using a shadow copy and having an external hard drive to put the shadow copy on. I know we don't all have money to throw away, but in this case an external hard drive will pay for itself the first time you try to recover all those photos that you spent time putting into folders and organizing.

Dear Christy,
I want this to work for you and if you leave your email address in the comments, I will not publish it and I can work with you by email or phone personally. I pray that I can be of help. Please try not to get too frustrated. I understand how hard it is when all that work looks like it is gone. Let's see if we can fix it together.

g

Friday, June 19, 2009

Recover Vault

Christy asked about Recovering a Vault. I am doing a quick show of Mem Man 3 because that is the version I have on this computer. I will look at my husbands in a bit to see if there might be a different way to do it on the earlier version. I have great faith that Creative Memories has fairly easy way on the other version. I could be a little overzealous. The welcome screen has a Recover Vault Icon in this example.

After selecting Recover Vault a dialog box appears giving you the choice to recover from a shadow copy or CD/DVD. Since I don't have one to recover right now, this is the end of my screen shots. I may recreate the process in order to have screen shots to post. I suspect that the items Christy's technician recovered look a bit funny when trying to load one by one. This software saves items in an interesting manner. Using its recovery system helps it to communicate with your items so that all your folders and info will reappear as you had them. I will be focusing on this tonight and may stay up late to put it into words.

I love looking into this stuff for you. I do realize this is a bit haphazard this time. Will put more time into it tonight.

Life beckons,
g


Thursday, June 18, 2009

Glitches.

I have gotten a bit caught up in a glitch that I have encountered with emailing pictures from Mem Man.
Of course summer and family stuff has kept me busy also.
I will be back on Tuesday or sooner with the shadow copy tut.
Thanks for you patience. I miss visiting here too.
g

Tuesday, June 9, 2009

How Goes?

Dearest followers,

I am asking for responses. How do these posts rate in your opinion? Am I filling a need still? I will maintain this place as long as I can find use for myself. The questions are fun to work on and I enjoy providing a helpful service. I thank you for the responses I have had so far. As far as text on a path, I am finding no way to make it happen with this program. I may just need to be satisfied with Word Art from my favorite designers and learn to make them in Elements. I hope everyone is having a wonderful summer.

g

Saturday, June 6, 2009

Adding Digital Elements to SBC+

I received a question concerning importing our goodies.
Marie asked:
I have hundreds of digi kits from websites and cd's I've bought.
How do I download them into Storybook

I looked to see if there may be a video at Creative Memories concerning this subject and was unable to locate any. So my screen shots will have to do. First the My Stuff icon is located on the welcome page. Clicking on this begins our journey into adding non-Storybook elements that we have collected.

Now I am choosing to Add Collection.


A dialog box will appear giving you a chance to name your collection. (note: the more collections you add, the slower SBC+ will load later. It is so easy to add a collection that you can afford to be discerning and add only your favorite go-to pieces. Also individual projects can be given their own collection name in order to have everything you want in one spot.)

Highlighting the collection I want to add paper to, I select Content. Then choose Add paper, this gives me a chance to go looking for the paper I want.


An Explore screen comes up and I go to to my organized files. I am looking for the file I have for Digitreats. Once I navigate to her folder, I look for the file containing the April papers from her shout kit. Found and clicked on that file. This is how that dialog box should look. Now I have the option to import everything in this file. If I only want one or two specific papers I will click on the picture of that paper. Second paper would require holding the Ctrl key and selecting simultaneously. If there is a group selecting the first one and using Shift and click together on the last one will select everything in between. Repeating these steps for embellishments is the same.

I have selected the papers I want. Now I will get selected papers.

These now appear on my paper tab under Package heading.

This tutorial has shown you from the beginning screen how to include items in My Stuff. Once a project is open, My Stuff can be accesses from the organize icon located at the bottom of the Papers, and Embellishments tabs.
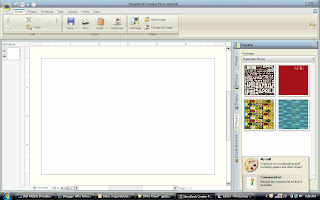
I realize this could be explained more concisely, but there it is. I like visuals and if more is needed let me know. I hope this helped you, because it helps me to get back to posting. I find it invigorating.
g

Vault

I am so glad that I haven't neglected y'all so much that you aren't still interested. I got a couple questions and they were easy enough to get to right away. I am addressing this one in this post:

Neilsongs asked:

Does one have to make a vault first or can you import your files at the beginning?


I have found the Memory Manager default begins a vault1 for us. When this was explained to me I thought it would be a little confusing to have more than 1 vault at a time. You have all the folders you need and the timeline constantly keeps up with your dates.
I have found a good use for multiple vaults, though. I have made plans to begin a service of scanning pictures for other people. I would use an individual vault for each client and set up a shadow copy so that I had backup for them.
The answer to the question from Neilsongs is yes you can just begin importing into the default vault and I recommend not setting up multiple vaults for your personal photos.

Wednesday, May 27, 2009

Memory Manager Links

I really like the ease of use with my digital products from Creative memories. When my new version of MemMan loaded and I got to play with it I found that the links on the startup screen will take you directly to a page with links to FABULOUS videos.

Following are 2 links that come from Creative Memories to these videos. Now that I have got you excited about the way these work, I will do a post on retrieving from a shadow copy. My favorite feature as I am so inclined to reformat my computer about once every 6 months. Try the videos on for size and let me know what you think. I am definitely liking the new features of the upgraded version of MemMan.

g

Friday, May 22, 2009

Update

I was unable to find my discs and repurchased MM and SBC+. When I went to get MM I found that they have updated it to a new version. Always one to try out new technology, I purchased the newer version. I hear that if you have the older version there is an upgrade price of about $9. I have a couple points to bring up before I wholeheartedly recommend that you get your upgrade. When I Sart my memory vaults I always set up a shadow copy. This is one of the selling points I most like about Memory Manager. This function is the best thing I have seen, so far. (Tutorial on it with screen shots coming tomorrow or next day.) When recovering my Vault with my older version Shadow Copy a dialog box was very clear in stating that the newer version would make changes to the data to make it compatible with newer version. This is when I began to sweat. What if it loses something and I can't go back and undo it? Well, I took my chances as I have not been disappointed with their stuff so far. Everything, all 9000+ pictures made it over smoothly. I like the new format. Took me a bit to find out where it was keeping track of my imports by date. But the program walked me through that as well. Now on to my function here on this blog.

I want to know if Memory Manager Tuts would be something my readers would be interested in. I still have found no way to get StoryBook Creator + to do a text on a path. Still looking. I like the fact that PSE will do it but I am still trying to prove that SBC+ is able to do almost anything they can do, just more user friendly. (Note: I am not Creative Memories Consultant so I don't ask for sales from this blog, just offer info and send you to your own personal consultant, for any purchases.)

My aim here is to share my love for this program with others interested in stretching their skills with it.

Sorry I was MIA for so long.
g

Saturday, May 9, 2009

Overlay answer from phone

Answering about overlay word art, all the text boxes can be grouped together by selecting each while holding down shift button. Once all items are selected the drop-down arrow on the activated elements boxes makes the grouping option available. Select group. This creates an element of all the pieces you selected. Right click on this element, choose save selection as... Options for saving in png format should be available.
I am away from my SBC+ so I hope I got it right.
g

Thursday, May 7, 2009

Word Art

Of course I used my own moniker for this post. You did ask about name papers. LOL. I am sure there are other ways, maybe even better ones for this task. This didn't take long and you could be as picky and detailed as you like. The program is very forgiving. I chose to do a name as I think this tutorial will get you on the right track for anything you want to do with fonts and wordart. I myself want to figure out how to put text on a path. That will be for another day.
Beginning with a new project, Select the Text ribbon. Clicking on the drop-down arrow above insert and below text gives you a place text on page option. You will create a text box to work with.


Inside this box you will click again to edit. This activates your text options. These include a black box with a drop down arrow next to it. This will be important in a minute. First choose the font and size you think you might like. Adjusting these to your liking before you copy and paste them will make less work later, but can be changed at any time.

When you have the text as you think you want it, right click on the text itself and choose copy. When you right click and paste the copy will always appear in the center of the screen. This presents you with options. We like options, don't we? You may choose to paste a few in succession and move the top one to a spot of your choosing. I personally pasted one, placed it and then repeated until I got something I liked. (side note: I have no concept of random placement. I like linear and perfect. As though I could ever attain it.LOL).

Create another text box with another font. Repeat the copy and paste process. Notice that all the text is black at this point. The program defaults to this color. Now comes the black box with the drop-down menu you found on the text tab earlier.


Clicking on the arrow gives you this color chart. Notice the black and pink bar on the lower right side? The top portion indicates the current color, the bottom changes color when you select one from the chart by clicking on it. This gives you a visual of what you will be seeing when you select ok. Now that you know how to change the color of the text, you can choose random parts of the page of text (holding the shift button each time you select another makes them all active at once) and color them.

Doing all the text boxes before coloring gives you the chance to choose different words, fonts, sizes, and placement on the page to be changed at once. I like that for seeing a little more of the big picture or final product at once.

Continue selecting around the page as you like. Remember if you want one item changed, just select that one item alone and do with it what you want. Very user friendly. Remember the undo button at the top.


I went ahead and played with the background a bit. Never claimed to be a designer, just a curious, bossy sort.
Once again, any input is appreciated. I have helped someone with the mask post over the phone and if anyone else feels that the instructions could be more complete or need something, let me know. I realize I ramble and by the time I publish my post I am absolutely convinced that it makes no sense.


g