Next, I am not all that thrilled with the exactness of my end product. I am somewhat of a perfectionist. You would not be able to tell that from some of my ramblings. So if you want a more perfect example to see, I will do another one when I am not tired, or busy, or preparing for a month-long trip. Sometimes, I just have to get it done. Besides, the precise nature of this is solely up to the artist(that's you, you know).
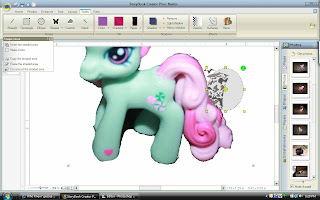
First, I want to get rid of as much excess as possible by cropping the picture. Then, on my page I make that picture as large as possible. It gets fuzzy sometimes, but that is ok. The larger the pixels are, the easier it is to get rid of the ones you don't want. Once you shrink it down to the size you will be using, the clarity returns. I used a shot I made of the toy we gave my cousin the other day.

Using cutters on the tools tab there are choices that are fun to play with. I like the ellipse shape. (The more I look at this silly example, the more I can't believe I am really putting this out there as an example of how to do this.) Feel free to call me lame.
 Working with large areas, I use a larger cutter in the closest shape resembling the edge that I want cleaned up. Saving after each cut helps to do small portions and not lose your work by just having taken on to much at once. I have experienced that so I know.


 My favorite shape cutter. I can really get it to clean up round edges. Very versatile to stretch so many directions. But you can find your own favorite shape cutter in the drop-down menu.
 Working with large areas, I use a larger cutter in the closest shape resembling the edge that I want cleaned up. Saving after each cut helps to do small portions and not lose your work by just having taken on to much at once. I have experienced that so I know.
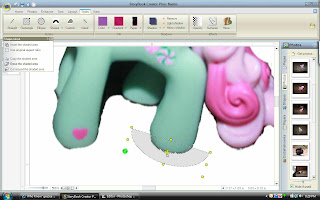
When using Custom cutter the curved edge type helps with smoothing round spots.
Funny looking, I know. If you can see the shaded area it is shaped funny. When following the edge of the figure you are extracting try not to be nervous when the shaded area crosses over itself. This will change when you click outside the figure to complete the area you want shaded. Each time you place the croshairs in a spot and click that creates another reference point to select for cutting purposes. When you need more reference points you can add using the + or take extra points away with the -. I like the one that lets you move an already existing point. A little more or less in case you drifted while clicking. This one has an arrow on either side of the point in the adding points dialog box.
 My favorite shape cutter. I can really get it to clean up round edges. Very versatile to stretch so many directions. But you can find your own favorite shape cutter in the drop-down menu.
I have tried to make sense here. I can just imagine what it is going to look like when I check it again tomorrow. I certainly hope you get something from this post. :)
Thanks once again GZ! I was hoping there was a less tedious way to do this with the wand tool. However, as tedious as it is, the end result is well worth it.
ReplyDeleteStrangely, the most challenging task for me (still) is getting the masks to work properly!! But I will persevere.
Samantha
Extracting is tedious, no doubt about it. though it does get easier ( and faster!) with time.
ReplyDeleteOne thing I do that helps is I zoom into the image. One the bottom left there is a magnifying glass - it defaults to 64%, but you can drag it up as high as 1000+ percent. I used to just make the image huge, but it does blur out and it can be hard to find the lines you want to cut along ... so now I leave the image and I just zoom way in. When you want to zoom back to the default, you hit the little square with the four arrows pointing in each direction.
Another tip - sometimes you can see your image better in black and white to get a cleaner extraction. How I make this work is I duplicate the image, make the top one black and white. I use the properties fields to make sure both images are in the exact spot in terms of left and top inches. Then I lock the black and white one, but keep it on top. I select my colour one on the left (so it is the one I am cutting, but can't see) and I use the black and white one as the guide for where to cut. Then when I am done - deleted the black and white one and the coloured one is there all nicely extracted.
And one more tip - hope you don't mind - a very slight edge blur on your extraction can help with some of those slightly darker edges. I'm talking a 2 or a 3 in the edge blur meter - very slight - but it makes a difference.