
I bought some of the most beautiful digi-goodness the other day and had to find something to use it in. So, here goes. Gaye, my new net-friend has just opened her shop and I think she has a great future here in our world. Her blog is http://gslcreations.blogspot.com/
Easter Garden Kit http://digital-scrapbooking.org/shop/easter-garden-p-2193.html
Now that I have made sure you love her as much as I do... it is time to cover my territory. Today is more of a hint than a tutorial. Plus: when I started putting this into words I realized that I had been doing exactly as jewel suggested in the last post. I have covered the area that I want to remove with the piece I am using as a guide placed above it.
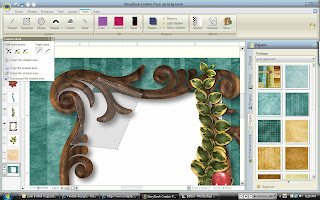
First I need to unlock the paper (by clicking the lock icon in our elements pallette and make it active so that it is the one I am cutting. (I made an initial cut using a rectangle shape cutter that did not extend beyond the outside of my frame. You can always take away, putting it back is not as easy.) Using Jewels hint I will lock my frame. If you are real astute you will notice that my screen shot does not show that. Amazing that I did this before I learned that trick. But, I am not such an old dog that I won't learn new tricks. Another reason I am so glad I have met all you new folks. Maybe we can get more people and have more input. I am having fun. I know, I know, I digress.
Selecting my custom cutting tool I am placing points along the frame that I know will be covering the empty space.

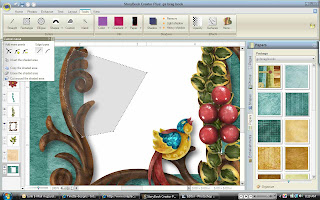
I find that expanding my cutting area into the white space helps me feel like I have some control over the cutting area. When I have made sure I haven't gone too far into the frame or extended into space I don't want taken out, The next step is to erase the shaded area.
 See, beautiful detail.
Now you see the paper underneath that we are trying to get rid of. It is pretty paper but it would get in the way of my picture when I place it underneath. See QP post http://geezee-whoknew.blogspot.com/2009/02/i-am-working-on-using-qp-from.html
I find that expanding my cutting area into the white space helps me feel like I have some control over the cutting area. When I have made sure I haven't gone too far into the frame or extended into space I don't want taken out, The next step is to erase the shaded area.
 See, beautiful detail.
have fun, I will go play in the snow now.
g
These are great tips! Thanks Geezee & Jewel for sharing....I just don't possess the kind of brain that could come close to working this all out. So all of this info is very much appreciated.
ReplyDeleteSo I have another question with a simple answer I hope. I have read the CM tutorials, but it does not seem to explain how to add alpha sets except to say 'see commercial vendor.' Does this mean that I can only use purchased CM alpha sets for this tool?
Samantha
Btw....I love the brag book page. I might actually buy that kit or keep my eye on more of Gaye's designs to come!
That is a really pretty brag book page! And Gayle does very pretty work:)
ReplyDeleteI started out doing the cutting without locking the top piece, and just made too many errors LOL ... it is always a bit of trial and error with these things I think.
As for the use of other alphas, I haven't found how to put them in the fancy alpha sets place - I just add them to 'my stuff' each as their own collection.
Well! How great is this? I never tried doing that! Thanks for the tut! My first day here but I'm sure I'll be back! Thanks for doing this!
ReplyDelete