First, crediting the designer whose product I chose. Here are the links to Digitreats store with the specific paper and alpha.
http://digitreatsshoppe.blogspot.com/2009/03/shout-alpha-3.html
http://digitreatsshoppe.blogspot.com/2009/02/shout-dots-and-stripes.html
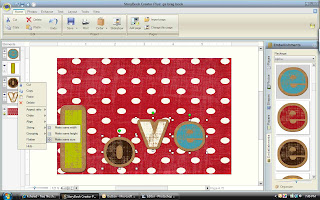
Now begin with loading alphas in the elements. Place the background and then drag onto the page the letters that you want to use. I found that this "l" is special so it will wait until later. First, adjust one letter to the size you want all of them to be. (*note: the anchor letter will be the last one selected in order to make all the others line up according to the one that is finished*)
 I made my "o" the size I want the letters to end up being. I also placed it in the vicinity of its permanent spot. Then selecting the "e", and shift plus "v" followed by the shift plus "o". (Holding shift when selecting a layer allows multiple layers to be selected.) After a multiple selection is made the sizing option becomes active. Select make same size.
 The align option has also become active with multiple layers selected. Choose align middle (align bottom is another option that would work here.) Now, the letters have lined up the way I want them. They can now be spaced by selecting space horizontally this is such a fantastic tool. A little "fiddling" could be called for here before grouping them .They can now be grouped together when aligned and spaced as you want them. This makes them one layer and can now be moved as one. This also makes them look like word art that all our favorite designers make look so fabulous.
 Now working with the special "l". I found that making it the same size as the other letters didn't look so good. Now I had to use my artistic eye to size and place it with the rest of the word in order to get the look I wanted. Good enough for me. Playing with severel letters like this at a time can be done by selecting and spacing and align similar shapes together. Okay, now I am rambling.
 I hope you enjoyed our time together again. I only have 5 more days here and my youngest is already starting the wailing about not wanting to leave. I want to cry along with him. :( but I know we will do this trip again.
Have fun,
g
This is great....I didn't even realize these functions existed! lol
ReplyDeleteI was able to go back into all the layouts I haven't printed yet and fix all my alphas....I even made my own word art...
Thanks for this!!
Samantha
Hello! Have you seen this on CM's site?
ReplyDeletehttp://projectcenter.creativememories.com/digital/digital-scrapbooking-project-ideas/
I just discovered it and they give you page ideas but then walk you through the steps! Plus CM now has embellishment freebies - torn edge to put on any paper, yeah!
Thanks for all your great tuts!
Kris